Showing posts with label main dish. Show all posts

Saturday, April 8, 2017

Pot of Gold

I got this recipe from my parents. I thought it would taste weird after seeing the list of ingredients, but then I made it and it was actually pretty good! This is a good recipe to use if you have the canned ingredients and noodles in your food storage. It's pretty cheap to make and really easy, too!


Ingredients
1 lb. ground beef
1/4 cup chopped onion (or dried minced onion)
1 can cream style corn
1 cup mild cheese (grated)
1 can tomato soup
1 can cream of mushroom soup
6 oz. noodles (I used half of a 12 oz. bag of noodles, but you could use more or less...whatever you want)

Directions

Brown meat and onion, cook noodles. Put meat and onion in casserole dish. Add noodles and remaining ingredients. Bake at 350 degrees 1 hour.


The second time we made this, we put a little extra cheese on top right after it came out of the oven. Yum!

Saturday, March 4, 2017

Crock Pot Tamale Pie

I came across this Fit Marriage website a couple of weeks ago and noticed the nutrition tab, so I clicked on it to see what recipes they had posted. One recipe that caught my eye was this crock pot tamale pie. And guess what? The crock pot that is shown in the video is exactly like the one we have! Haha! We had all of the ingredients except the cornmeal, so I had Ryan pick some up so we could try this the next Sunday. We also didn't have any fire roasted diced tomatoes with chilies, so we just used a can of diced tomatoes without chilies.


Filling ingredients:
1 lb. cooked ground beef (I just used 1/2 a lb.)
1 15 oz. can black beans drained & rinsed
1 15 oz. can fire roasted diced tomatoes with chilies
1 15 oz. can corn drained
1 Tbsp. chili powder or taco seasoning
1 tsp. ground cumin
1/4 cup diced onions
1 cup cheddar cheese

Cornbread topping ingredients:
3/4 cup cornmeal
1 1/4 cup flour or gluten-free baking mix
1 tsp. baking powder – omit if using gluten-free mix that has baking powder
1 cup milk
1/4 cup sugar
1 large egg

Directions:
Spray stoneware with cooking spray.

Combine all filling ingredients from above in crock pot. Stir ingredients together until thoroughly mixed as you will not be able to mix again. (I combined all ingredients in a bowl, stirred them together, and then put the mixture in the crock pot.)

In a large bowl, mix all topping ingredients from above. Stir to a smooth texture, then pour topping onto filling in crock pot.

Cover and cook on low for 4-6 hours.


I think the recipe originally said 6-8 hours, and that's what the lady says in the video. Funny thing is, since the crock pot is exactly like ours, when I read/heard the 6-8 hours, I said out loud to Ryan "I bet it will be done in about 5 hours!" And then watching the video, they said it was done in 4 1/2 hours. Ha ha! I knew it! Every crock pot recipe I have ever tried has always been done a lot sooner than what the time on the recipe says. It is a good crock pot! :)

This recipe was perfect to make on Sunday--with 3 hours of church and then about an hour of choir practice, that's 4 hours. I set the timer for 4 1/2 hours and started it about 15 minutes before we left to go to church, so it only had about 15 minutes left by the time we got home! Right as we walked in the door, we immediately smelled the tamale pie and it smelled sooooo good!

I remember when I was younger, my mom occasionally bought canned tamales from the store. I used to eat them. Then I got sick of them after a while. When I tasted this crock pot tamale pie, it reminded me of when I used to eat canned tamales...only it was a LOT better!

So healthy! So delicious! So easy! You should try this! :)

One suggestion, though... even if you use a crock pot liner, you might still want to spray it with cooking spray. We didn't and the topping got stuck to it. Oops!

Thursday, January 19, 2017

Fresh Tomato Soup

When Ryan and I had a bunch of tomatoes from our garden, we thought that maybe we could try making some homemade tomato soup! It was a good way to use up a lot of the tomatoes we had before they went bad. After looking at the ingredients on canned tomato soup (yuck!), I thought homemade tomato soup would be a good idea. :) I searched the internet and found the recipe below (found here).


Ingredients:
3 medium tomatoes, peeled and quartered
1 1/2 cups water
1/2 cup chopped onion (1 medium)
1/2 cup chopped celery (1 stalk)
1/2 6 ounce can (1/3 cup) tomato paste
2 tablespoons snipped fresh cilantro or basil
2 teaspoons instant chicken bouillon granules
1 teaspoon sugar
Few dashes bottled hot pepper sauce
Snipped fresh cilantro or basil (optional)

Directions:
If desired, seed the tomatoes. In a large saucepan combine tomatoes, water, onion, celery, tomato paste, the 2 tablespoons cilantro, bouillon granules, sugar, and hot pepper sauce. Bring to boiling; reduce heat. Simmer, covered, about 20 minutes or until celery and onion are very tender. Remove from heat and cool for 10 minutes.

Place half of the tomato mixture in a blender or food processor. Cover and blend or process until smooth. Repeat with the remaining mixture. Return all to the saucepan; heat through. If desired, garnish with additional cilantro.

Makes 4 servings (4 cups)


The nutrition facts on the website says that one serving (1 cup) of the soup is 53 calories. Just for fun, I looked to see how many calories canned tomato soup has -- 90 calories for 1/2 cup, which would be 180 for 1 cup. Crazy, the difference in calories between this homemade tomato soup and canned tomato soup! I made this soup twice and tripled or quadrupled it each time so that I could use more tomatoes. (I think I quadrupled it so I could use 2 full cans of tomato paste--since the single recipe calls for 1/2 a can.) The first time I made it, we didn't have celery. It was ok. The second time I made it, I added celery to it and it was a lot better! So I recommend the celery. Also, I didn't put as much hot pepper sauce in it the second time. It was a little too spicy the first time I made it, so just a couple of dashes of the hot sauce is plenty (when quadrupling it).

Tuesday, November 29, 2016

Pineapple Salsa Chicken

Guess where this recipe came from? If you guessed Mel's Kitchen Cafe, you are right! I LOVE that site! I've made five recipes so far from the site and none of them have disappointed me (us)! Ryan and I are still trying to eat healthy but also cheap now that we're starting to pay back his school loans. This is a great recipe that only uses four ingredients! The most expensive thing is the chicken, but it makes enough for three or four meals for the two of us, so it ends up being cheap! Hooray!


Ingredients:
6 fresh or frozen chicken breasts
1 (20-ounce) can crushed pineapple, drained
2 (15-ounce) cans black beans, rinsed and drained
2 cups mild or medium salsa

Directions:

Place the chicken in the crock pot and add the rest of the ingredients. Cook on low for 6 to 8 hours. Using tongs, remove the chicken to a cutting board and shred into bite-size pieces. Mix the chicken back in with the rest of the ingredients. The mixture will be fairly soupy – I like to drain off some of the excess liquid before serving, especially if we are eating it in tortillas, so it doesn’t make everything soggy. Serve with tortilla chips and garnishes, like tomatoes, cheese, avocado, sour cream, etc.


I didn't have crushed pineapple, so I used what we had which was pineapple tidbits. It worked out just fine. I also just cooked mine for 5 hours. Our crockpot cooks things really fast, so I checked it after 5 hours and it was done. We had ours on top of quinoa, and it was delicious! You could also put it on top of brown rice. We didn't add any of the listed garnishes on top, like tomatoes and cheese, but I'm sure it would taste even better with those things! I used two cans of black beans instead of one can of black beans and one can of great northern beans (that's what Mel used), but you can make yours however you want to. Next time, I'd probably add some herbs and spices to it, but other than that, it was great!

Tuesday, October 4, 2016

Honey Lime Chicken Enchiladas

This recipe is a keeper! Here's another awesome recipe from Mel's Kitchen Cafe! You can find it here. These are different from the traditional enchildadas with meat (chicken or beef) and beans, but they are really good!


Ingredients:
6 tablespoons honey
5 tablespoons lime juice (1 large lime)
1 tablespoons chili powder
1/2 teaspoon garlic powder
1 pound chicken, cooked and shredded
8-10 flour tortillas
1 pound monterey jack cheese, shredded
16 ounces green enchilada sauce
1 cup sour cream (or heavy cream)

Directions:
Mix the first four ingredients and toss with shredded chicken. Let it marinate for at least 1/2 hour. Pour about 1/2 cup enchilada sauce on the bottom of a 9x13 baking pan. Fill flour tortillas with chicken and shredded cheese, saving about 1 cup of cheese to sprinkle on top of enchiladas. Mix the remaining enchilada sauce with the cream and leftover marinade. Pour sauce on top of the enchiladas and sprinkle with cheese. Bake at 350 degrees for 30 minutes until brown and crispy on top.


We used lime juice in a bottle, not from an actual lime. We also used a mixture of cheddar and monterey jack cheese, since that's the cheese we get all the time. It was delicious!

If you want to try other recipes from Mel's Kitchen Cafe, so far I've tried the White Bean and Tuna Salad, Oatmeal Pancakes, and Baked Oatmeal. They are ALL good!

Thursday, September 29, 2016

Whole Wheat Pizza Crust

Since we have wheat that we've been grinding to make homemade bread (and pancakes), I decided to find a recipe for whole wheat pizza crust. I found a good one here. It was definitely different than the other recipe that we always used for pizza crust, but it was good. :)


Ingredients:
1 teaspoon white sugar
1 1/2 cups warm water (110 degrees F/45 degrees C)
1 tablespoon active dry yeast
1 tablespoon olive oil
1 teaspoon salt
2 cups whole wheat flour
1 1/2 cups all-purpose flour

Directions:
In a large bowl, dissolve sugar in warm water. Sprinkle yeast over the top, and let stand for about 10 minutes, until foamy.
Stir the olive oil and salt into the yeast mixture, then mix in the whole wheat flour and 1 cup of the all-purpose flour until dough starts to come together. Tip dough out onto a surface floured with the remaining all-purpose flour, and knead until all of the flour has been absorbed, and the ball of dough becomes smooth, about 10 minutes. Place dough in an oiled bowl, and turn to coat the surface. Cover loosely with a towel, and let stand in a warm place until doubled in size, about 1 hour.
When the dough is doubled, tip the dough out onto a lightly floured surface, and divide into 2 pieces for 2 thin crust, or leave whole to make one thick crust. Form into a tight ball. Let rise for about 45 minutes, until doubled.
Preheat the oven to 425 degrees F (220 degrees C). Roll a ball of dough with a rolling pin until it will not stretch any further. Then, drape it over both of your fists, and gently pull the edges outward, while rotating the crust. When the circle has reached the desired size, place on a well oiled pizza pan. Top pizza with your favorite toppings, such as sauce, cheese, meats, or vegetables.
Bake for 16 to 20 minutes (depending on thickness) in the preheated oven, until the crust is crisp and golden at the edges, and cheese is melted on the top.


We did not let it rise the second time because we were too hungry and wanted to eat it! So after letting it rise for an hour, we went ahead and rolled it out and made our pizza. It turned out great!


More for seconds! This single recipe made one pizza for us (the crust wasn't too thick). I told Ryan that we should go into a pizza making business because our homemade pizzas are always so good! We'll definitely be using this recipe again. :)

Wednesday, September 14, 2016

Harvest Spaghetti and Chicken

Over on the side, there's a link and a button for a recipe blog from some of my cousins. They call it The Recipe Society. Of all the new recipes I've been making lately, not one of them came from The Recipe Society. So, I decided to look on the blog and find a recipe to try. We've been getting quite a few zucchini out of our garden (hence all the zucchini recipes lately), so of course I had to make another recipe that uses zucchini! I decided to try the Harvest Spaghetti and Chicken recipe. It was delicious! Thanks to John (my cousin) for the recipe! Or was it from Tawnie? It says 'Posted by John' so I wasn't sure. :)


Ingredients:
2 chicken breasts, cut in small pieces
3 Tbsp. cooking oil
2 cups zucchini, thinly sliced
3 med. carrots, sliced thin (or baby carrots, cut up)
2 garlic cloves, minced.
1 Tbsp. flour
1 1/2 cups milk
1/3 cup grated Parmesan cheese
1 tsp. salt
1/2 tsp. basil
8 oz. spaghetti, cooked

Directions:
Stir fry the chicken pieces in oil until tender and add vegetables and cook until just tender. Sprinkle and stir flour into the mixture and add milk, all at once, and cook until slightly thickened, stirring constantly. Add cheese, salt and basil and fold into the cooked spaghetti and serve. Serves about 8.


The less I have to touch uncooked chicken, the better. :) I didn't want to cut up uncooked chicken, so I actually poached some chicken tenderloins first. Then I set them aside while I heated the oil in a pan and cooked the veggies. While the veggies were cooking, I tore the cooked chicken into bite sized pieces and put them in with the veggies. Then I followed the rest of the directions after that. This dish was amazing! We used whole grain spaghetti noodles, so it was filling yet so refreshing with the veggies! I'll definitely make this again. :)

Friday, September 2, 2016

Stuffed Green Peppers

Ryan said his Grandma Adams used to make really good stuffed peppers, so I asked her if she could send me the recipe since we've been getting peppers from our garden. I have never had stuffed peppers before, so I really wanted to try them! This is a great recipe! :)


Ingredients:
6 large green peppers
1 lb. ground beef
1/2 cup chopped onion (or minced onion)
16 oz. can tomatoes, not drained (or fresh tomatoes, cut up and peeled)
1/2 cup rice, uncooked
1/2 cup water
1 tsp. salt
1 tsp. Worcestershire sauce
1 cup cheese, grated
black pepper

Directions:
Cut off tops of peppers. Chop enough tops for 1/4 cup and set aside. Cook green peppers in boiling water for at least 5 minutes. If needed, cook a little longer. Drain. Sprinkle inside lightly with salt.
In skillet cook ground beef, onion and 1/4 cup green pepper until browned & vegetables tender. Drain fat. Add tomatoes (canned or fresh), uncooked rice, water, salt, Worcestershire sauce, and pepper. Bring to boil. Reduce heat, cover & simmer 15-18 minutes, or until rice is tender. Stir in cheese. Stuff peppers with meat mixture. Place in baking dish. Cover with foil and bake at 350 degrees for 30-35 minutes.


This recipe didn't specify what type of rice to use. We just had some brown rice that takes 40-50 minutes to cook, so that's what we used. I'm guessing that since it says to simmer for 15-18 minutes that it's supposed to be instant rice. Oops! We just let our mixture sit and simmer for about 40 or 45 minutes and the rice was fine.

We used fresh tomatoes, but we did not peel them. In the pictures you will notice the skin of the tomatoes in the filling. It was still good without peeling the tomatoes if you want to save a little time and just cut them up. If you want to peel them, the easiest way is to put them in a pan on hot water for a few minutes. The skin should peel off easily.

Also, we ended up having more than 1/4 cup of chopped green peppers after cutting the tops off, so we doubled all the rest of the ingredients (except the beef) and we had enough filling to stuff some zucchini too! They were both really good--the peppers and zucchini! :)

Now for the zucchini, you'll need to boil them after cleaning out the middle so that they are soft. Then bake the same as the stuffed peppers.


When Ryan's grandma sent the recipe to me, she said "Hope you enjoy because Grpa sure did." Ryan was really close to his Grandpa Adams growing up. He passed away in January 2007, so I was able to get to know him for a couple of years. After Ryan's grandma said that his grandpa enjoyed them, it made this recipe even that much more special.

I really do hope that anyone who tries this recipe enjoys them! :)

Sunday, August 28, 2016

Creamy Chicken

I wanted to try a creamy chicken recipe, so as usual, I looked online to see if I could find a good recipe. I found one HERE. I really like allrecipes.com! They always have good recipes. This one is one of my favorites! :)


Ingredients:
4 skinless, boneless chicken breast halves (or chicken tenderloins--enough to cover the bottom of a casserole dish)
1/2 tsp. salt
1/2 tsp. ground black pepper
1/2 tsp. garlic powder
1 can cream of chicken soup

Directions:
Preheat oven to 375 degrees F (190 degrees C). Clean chicken breasts and season with salt, pepper and garlic powder (or whichever seasonings you prefer) on both sides of chicken pieces. Bake for 25 minutes, then add cream of chicken soup and bake for 10 more minutes (or until done). Serve over rice or egg noodles.


Creamy Chicken over brown rice with fresh tomato!

We made this twice. The first time we pretty much followed the directions, except I didn't clean the chicken. I just put the chicken in a pan and sprinkled black pepper and garlic powder on top and then followed the directions on the package to cook it. I didn't season the chicken with salt because I knew that the cans of soup have plenty of sodium in them. (I've been trying to cut back on sugary things and salty things.) I only used one can of soup like the recipe said, and I added a little bit of sour cream which is what some of the people said in the reviews. It tasted really good with the sour cream, but there didn't seem to be a lot of sauce to it. The second time we made it, we used a can of cream of chicken soup and a can of cream of mushroom soup, and we also added sour cream to it. We sprinkled some rosemary on top as well. It was a lot better! I'd like to try it with peas and carrots, which was also mentioned in the reviews (to make it like a chicken pot pie ... but without the high calorie/carb crust). :)

This was really good and so easy to make! I highly recommend this recipe to everyone!

Sunday, June 26, 2016

Fettuccine Alfredo

I've always heard that fettuccine alfredo wasn't that healthy, especially the sauce. But when making it homemade, you know what ingredients go into it, so it's not as unhealthy. The link above mentions that other sauces use heavy cream and a lot of Parmesan cheese in the recipe, but this recipe I used doesn't call for any heavy cream, and it only calls for 2 Tbsp. of Parmesan cheese. Very yummy!


Ingredients:
1 cup fettuccine pasta
2 Tbsp. butter
2 Tbsp. flour
1 cup milk
1/4 tsp. garlic powder
1/4 tsp. salt
2 Tbsp. Parmesan cheese
parsley flakes

Directions:
Cook fettuccine according to directions. Melt butter. Stir flour into butter until you have a nice paste. Slowly stir in milk. Cook and stir over medium heat until thickened and bubbly. Stir in garlic and salt and cook one more minute. Remove from heat and stir in Parmesan cheese. Divide pasta onto two plates. Pour Alfredo sauce over pasta and sprinkle parsley on top.


We didn't have fettuccine pasta, so we just used egg noodles. It was delicious!

This is from the Cooking for Two book found here:

Friday, January 8, 2016

Sticky Chicken

Last year for Christmas, Ryan's parents gave us a cookbook that their ward put together. I haven't made anything from it yet (besides a couple of the dessert recipes from Ryan's mom that we already had the recipes for, and broccoli cheese soup from his grandma which we also already had), so I decided to flip through it and see if there was something I could make. I found this recipe that calls for apricot jam and decided to make it because we had a jar of apricot jam in the fridge that we weren't eating. (There was only about 1/2 a cup of jam in the jar, so this recipe was perfect to use it up! I'm not fond of apricot jam unless it's in something like apricot chicken or this recipe which are both very similar.) This is delicious! It would taste great over rice or noodles, but we have a bag of lettuce that we need to eat before it goes bad, so we're going to be eating it on top of some lettuce and using the sauce as the salad dressing. Yum!


Ingredients:
1 pkg. skinless chicken breast (I used chicken tenderloins, enough to fill a 9x13 inch pan)
1 envelope dried onion soup mix
1/2 c. apricot or peach jam
1/4 c. ketchup
1/4 c. water (I forgot to add the water, but it still turned out great!)

Directions:
Arrange chicken breast (or tenderloins) in a shallow baking pan. Mix other ingredients together and pour over chicken. Bake at 375 for approximately 40 minutes.

Tuesday, December 8, 2015

Crockpot Creamy Chicken

This was our first time cooking something in a crockpot, so we just found a very easy recipe to 'experiment' with. Now that we know how easy and delicious it really is, we're hoping to use our crockpot more often!!! We have a few recipes we want to try, so I'll post them when we get around to making them. I got this Creamy Chicken recipe here.


Ingredients:
4-5 chicken breasts
1 large can cream of chicken soup
1 small can cream of mushroom soup
2 carrots, sliced
1-2 tsp. seasoned salt
1/4 cup milk

Directions:
Place chicken breasts in bottom of crock pot and add both cans of soup over chicken. Add carrots, seasoned salt and milk over top. Cook on low for about 5-6 hours. (Read below for more info!)


Now, this recipe says to use frozen chicken, but as I was searching online for a simple recipe we could experiment with, I came across a website where someone said not to use frozen chicken. The reason is because meat needs to get to a certain temperature (I think 140 degrees) as quickly as possible. Otherwise there's a chance for bacteria to get in the food. I didn't want to risk anything, so we thawed/browned the chicken in a skillet first before putting it in the crock pot. Since we did that, we only had it cooking in the crock pot for about 3 1/2 hours instead of 5-6 hours.

We had a bag of baby carrots, so we just used them and cut a few of them up instead of using 2 bigger carrots. I also found other recipes that called for mushrooms, so we decided to put mushrooms in this one too. :)

It was kind of weird to me to have the milk just sitting on top in the crock pot, so after we poured the milk in, we kind of mixed things together a little bit.

Also, I wasn't sure what the "large can" and "small can" of soups were (we just have the same size cans of soups), so we used two cans of cream of chicken soup and one can of cream of mushroom.

See? We had to literally experiment with this! It's fun to experiment! (But just hope it turns out!) :)


It was delicious! We had it over brown rice with some green beans. Nice and healthy meal! :)

Sunday, July 19, 2015

Homemade Enchilada Sauce!

Don't forget to scroll down to see the recipe for Easy Chocolate Pudding! :)

A few weeks ago, Ryan and I wanted to make enchiladas. We got the meat browned and the beans mixed into it. We also had the mixture rolled up in the tortillas... Then we realized we didn't have any enchilada sauce! What are enchiladas without the sauce?!? This was on a Sunday, and we don't shop on Sundays. So what did we do? We looked online and found a recipe for homemade enchilada sauce! We only made it once, so I don't have any pictures. I was going to wait until we made it again and got it just how we like it, but we decided to try the packets of enchilada sauce from the store and we really like the flavor of them... so we might not make this homemade recipe for a while, but I thought I'd share it anyway! It was tasty!

Ten Minute Enchilada Sauce

What you will need:
1/4 cup vegetable oil
2 tablespoons self-rising flour (we just used all-purpose flour)
1/4 cup chili powder
1 (8 ounce) can tomato sauce
1 1/2 cups water
1/4 teaspoon ground cumin
1/4 teaspoon garlic powder
1/4 teaspoon onion salt
salt to taste

Directions:
1. Heat oil in a skillet over medium-high heat. Stir in flour and chili powder, reduce heat to medium, and cook until lightly brown, stirring constantly to prevent burning flour.
2. Gradually stir in tomato sauce, water, cumin, garlic powder, and onion salt into the flour and chili powder until smooth, and continue cooking over medium heat approximately 10 minutes, or until thickened slightly. Season to taste with salt.

I think we cooked it a little too long in step 1, so be careful about that! Also, we got the recipe HERE. If you go to the pictures, ours looked more like picture number 5. Ok, maybe I'll go and get it and post it here on the blog....


There it is! That's about what ours looked like. Maybe ours was a little darker because we might have cooked it too long. I would strongly suggest reading all the reviews about it, then experiment with it and see how you like it! It really does taste like a sauce you'd have at a Mexican restaurant. Much better than canned sauce! :)

Wednesday, April 1, 2015

Italian Spaghetti Pie

If you like Italian food, you'll LOVE this! This is actually not a new recipe, but Ryan and I have only made it once before, and that was about 3 or 4 years ago. We got this recipe from Ryan's mom, and it's delicious! We decided to pull it back out and make it again since it's been a while. Plus I wanted to post it here on the recipe blog, so here it is!


Ingredients:

6 oz. speghetti noodles
2 Tbsp. cooking oil
2 eggs, beaten
1/8 tsp. garlic powder
3/4 cup shredded mozzarella cheese
1 lb. hamburger
1/2 cup chopped onion
1/4 cup green pepper
1 jar spaghetti sauce
16 oz. cottage cheese

Directions:

Cook spaghetti; drain. Mix oil, eggs, garlic powder, and 1/4 cup mozzarella with spaghetti. Place mixture in a lightly greased 9x13 inch pan. Shape to form crust. Saute hamburger, onion, and pepper together. Then stir in spaghetti sauce. Spread cottage cheese over crust, then cover with meat sauce. Bake, covered, at 350 degrees for 35-40 minutes. Uncover, sprinkle with more mozzarella (and other cheese if you like), and return to oven until melted. Let sit 5 minutes before cutting.

Saturday, March 21, 2015

Homemade Chili

This is a recipe that I got from a cousin's wife. :) It's so easy to make and so good! If you like chili, you should try this recipe! Below is a single recipe, but I doubled it for this pot shown in the picture...


Ingredients:
1 can kidney beans
1 can black beans
1 can diced tomatoes (not drained)
1 16 oz. jar mild Picante sauce (we used medium Pace chunky salsa)
1 lb. cooked ground beef (doubling this, I only used 1 1/2 lbs. instead of 2 lbs.)
1 cup shredded cheddar cheese
Chili powder
Onion powder
Directions:
Rinse off kidney beans and black beans. Heat in a pot with tomatoes and sauce (or salsa). Add cooked ground beef, cheddar cheese, and spices. Heat until cheese is melted.

That's about it! So simple and delicious! Instead of adding spices in at the end, we added spices in with the ground beef while we were browning it. Along with the chili powder and onion powder, we used seasoned salt, ground cumin, and minced garlic. You can add whatever spices you like to fit your taste! You can serve the chili alone or with chips and/or sour cream and/or guacamole and/or more shredded cheese on top. However you like to eat it! :)

Don't you love the plate of cupcakes in the background? Heehee! :)

Friday, March 6, 2015

Hamburger Gravy

I remember when I was younger, my mom would often make rice and gravy for dinner. It's been quite a long time since I've had rice and gravy, so I found a recipe for hamburger gravy and decided to try it! My mom made her gravy from scratch and I have since gotten the recipe from her. This recipe I tried is very similar to how my mom always made it (except she used packets of brown gravy mix or beef bouillon cubes for the extra flavor).


Ingredients
1-1/4 pounds lean ground beef (I just used 1 pound)
2 Tbsp. and 2 tsp. all-purpose flour
2-2/3 cups milk (I think I just used 2 cups of milk so it wouldn't be so runny)
salt and pepper to taste
3/4 teaspoon onion salt (I used onion powder)
2/3 small onion, chopped (optional) (I didn't use onion)

Directions
(The recipe above is scaled to 4 servings, but the original recipe here is scaled to 6 servings. The directions below still refer to the original recipe of 6 servings.)

1. Place hamburger in a large, deep skillet. Crumble and cook over medium high heat until evenly brown. Remove from heat and sprinkle flour over cooked hamburger. Stir until evenly coated and all fat is absorbed.

2. Place skillet over medium heat, add 1/2 of milk and stir until gravy begins to thicken. Add remaining milk until desired consistency has been reached and gravy comes to a boil. Season with salt, pepper and onion salt.

3. Serve over mashed or boiled potatoes, toast or biscuits. Add fresh chopped onion if desired.


Ryan and I had it over rice. I'm not sure why the recipe doesn't have rice as one of the options. It's delicious and reminded me of my childhood when my mom would make rice and gravy. :)

Beef Stroganoff

I'm back! Life has been busy with packing and moving and unpacking and getting settled in our new place, so I've been neglecting this recipe blog! We are almost all unpacked now. (Whew!)

Here's another recipe from the Slow-Cooker cookbook! We made this about 2 1/2 weeks ago for some of my family who helped us move. It was really good and easy to make!


Ingredients
1 1/2 to 2 lbs. round steak (we used petite sirloin steaks)
2 tsp. beef bouillon
1 onion, chopped (I think we just used dried minced onion)
1 C. mushrooms, sliced (I don't think we put in the mushrooms because one of my sisters doesn't like them, plus I don't think we had any at the time)
1 tsp. parsley flakes
2 10-oz. cans cream of mushroom soup
Salt and pepper
1/4 C. Worcestershire sauce
1 C. sour cream

Directions
Cut steak into 1-inch pieces; place in slow-cooker. Sprinkle bouillon, onions, mushrooms, and parsley flakes over steak. Spread soup over top. Sprinkle with salt and pepper. Cook on high 3-4 hours or low 7-8 hours. Stir in Worcestershire sauce and sour cream. Cook on high 30-60 minutes. Serve over hot cooked egg noodles.


See? Really easy! I believe we started this soon after we got up one day, then had it cooking on the low setting for 7-8 hours. We packed things, then had some of my family come over and help us move some stuff while it was cooking. Then by the time we were done with moving the load of stuff for the day, dinner was ready! All we had to do was cook some noodles. I love making dinner using the crockpot! It even tastes good as leftovers, eaten on paper plates... haha!


Enjoy!!!

Friday, February 13, 2015

Crock Pot Lasagna

Ryan got this crockpot lasagna recipe from his work, so we decided to try it! It's actually really, really good! I love it!

Ingredients
1 lb. ground beef
2 garlic cloves
6 oz. tomato paste
5 oz. grated parmesan cheese
16 oz. lasagna noodles
1 1/2 tsp. salt
1 yellow onion (chopped)
29 oz. tomato sauce
16 oz. cottage cheese
8 oz. shredded Mozzarella
1 tsp. dried oregano

Directions
Brown ground beef, onion and garlic in fry pan. (Ryan and I used minced garlic and minced onion.) Add tomato sauce, tomato paste, salt and oregano. (We used three 8 oz. cans of tomato sauce since that's all we had. It made it only 24 oz., so we added a tiny bit of water.) Cook until meat sauce is warm. Mix the cheeses in a separate bowl. Spoon a layer of meat sauce onto the bottom of the crock pot. Add a double layer of uncooked lasagna noodles (break to fit) and top with a layer of the cheeses. Repeat with sauce, noodles and cheeses until all are used up. Add 1/2 cup of water around the outside edge of the lasagna. Cover and cook on low for 4-5 hours. Serves 6.

This was delicious and easy to make! The sauce can also be used as a spaghetti sauce. It was SO good! It was a little runny when it was done, so we ate it in bowls. After it cooled off, it set up more and wasn't so runny. So maybe just using the three 8 oz. cans of tomato sauce would be fine without adding the extra water. We were just experimenting. :) See below for more suggestions!

(I've decided that it's hard to get a good picture of lasagna because it looks disgusting... but believe me... it was really tasty!)


Suggested Variations to Basic Crock Pot Lasagna Recipe
1. Be aware that the size and shape of your crock pot affects the timing. Also, some crock pots cook faster than others. This recipe is more time sensitive than most. Similar recipes have been dry - do not overcook. Add a bit more water especially if you will not be able to keep an eye on it.
2. Use pre cooked oven ready lasagna noodles - it cuts the cooking time in half. Or partially cooked regular noodles have been used. If using dry noodles, make sure they are covered in liquid to prevent burnt or dry edges. (Ryan and I used dry noodles, and we made sure to keep them away from the edge of the crock pot so they wouldn't burn.)
3. Suggested additional seasonings: fresh or dried basil, garlic powder, Italian seasoning, in the sauce, parsley flakes in the cottage cheese. Eggs have also been added to the cottage cheese & dried parmesan cheese as per oven lasagna recipes.
4. Ricotta cheese has been used instead of cottage cheese. This would be drier, so make allowances for that.
5. Simplify by using pre made spaghetti sauce instead of the other sauces.
6. Add canned or freshly cooked mushrooms.
7. Save some of the mozzerella cheese and put on top about one half hour before serving.
8. This recipe may be assembled in the pot the night before, refrigerated and cooked the next day. Shortens cooking time.

ENJOY!!! :)

Sunday, February 8, 2015

Mac & Cheese (in the crockpot!)

This recipe came from the Slow-Cooker cookbook. It wasn't my favorite. If you want a really good mac & cheese recipe, try this one! I think I've just been too spoiled by that other mac & cheese recipe, so any other mac & cheese doesn't taste too good to me. Haha! I'm sure this one would taste a lot better if you added some spices!


2 C. macaroni, uncooked
1 Tbsp. butter
2 C. water
2 C. milk
1 tsp. salt
2 Tbsp. flour
1 C. cheddar cheese, grated
3 slices bread, toasted
2 Tbsp. butter
1/4 tsp. pepper

Turn slow-cooker to high. In a skillet, saute macaroni in butter until edges start to brown. Pour water and milk into slow-cooker. Add macaroni noodles and salt. Stir well. Cover and cook on high 60-90 minutes or low 2-3 hours or until macaroni is done. Sprinkle flour and grated cheese over top. Stir until cheese is melted. Cut toast into cubes. Saute in butter. Toss over macaroni. Sprinkle with pepper. Cook 30 minutes.


I don't know why you have to turn the slow-cooker to high at the very beginning. I'd suggest if you're planning to cook it on low for 2-3 hours rather than on high 60-90 minutes, turn the slow-cooker to low at the beginning. I turned it on high like the recipe said, then switched it to low so I could cook it for 2-3 hours, but the macaroni ended up getting too mushy after about 2 hours. If you try this recipe, keep checking the noodles to see when they are done so that they don't get too soft and mushy! That's just my advice! :)

Monday, January 12, 2015

Crockpot Tater-Tot Casserole

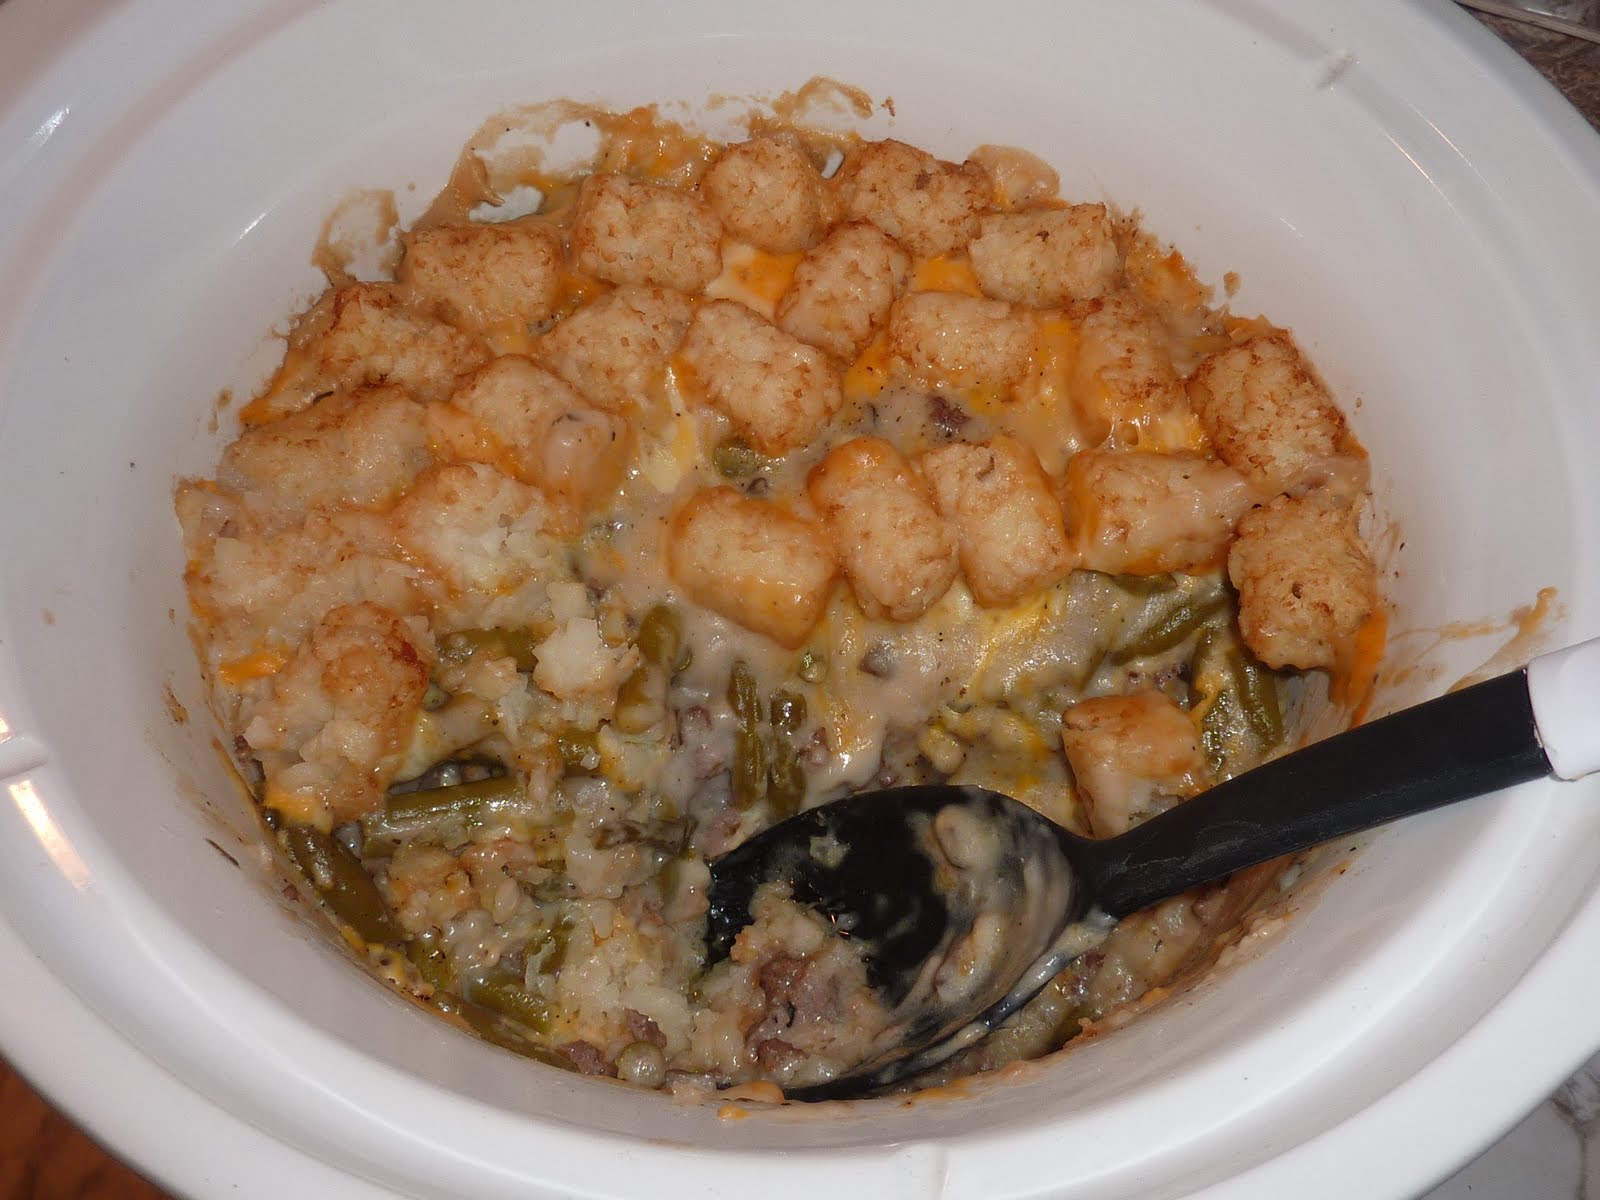
I got this cookbook for Christmas. My work gives everyone a little bit of money so we can buy ourselves a Christmas gift. This is one of the things I got for myself with the Christmas money! :) I want to use our crockpot more often, so this cookbook will give me more ideas of what to make. I saw the recipe for tater-tot casserole and it sounded good, so I decided to make it! The only other thing we've made in the crockpot is Creamy Chicken, so it was fun to do something different besides chicken.


BEEF! It's what's for dinner! (Seriously, this recipe calls for a LOT of beef!)


Ingredients:
2 lb. ground beef
16-oz. bag Tater-Tots
2 cans green beans, drained
2 can cream of mushroom soup
1 cup milk
Salt and pepper to taste

Brown and drain ground beef. In slow-cooker, mix 1/2 bag tater-tots with ground beef. Spread green beans over top. Pour soup and milk over green beans and sprinkle with salt and pepper. Spread remaining tater-tots on top. Cover and cook on high 2-3 hours.

Cheesy Tater-Tot Casserole:
Add 1 cup grated cheddar cheese before top layer of Tater-Tots.


You can see that the time on the crockpot says 2:23. We did ours for 2.5 hours. It seemed to be enough time. The thing I like about this compared to the chicken recipe we made is that we didn't have to worry if the meat was cooked all the way since it was already browned before we put it in the crockpot. Very easy meal! (But I suggest using a little less meat... maybe 1 or 1.5 lbs.) As you can see, we did the Cheesy version! We LOVE cheese! Look at all that melted cheese...


Add a salad and some rolls or bread with this meal, and you have a nice and hearty meal! (That's what Ryan called it... a hearty meal!)


We had lots of leftovers! I love leftovers because that means I don't have to cook every day! :)


Hope you enjoy this recipe as much as we did! :)
Related Posts Plugin for WordPress, Blogger...